Sending a fax cover sheet is securing more document, letting recipient know what’s coming his way. Fax cover sheet is an optional document, but there are so many advantages of it and that’s why people prefer to send it along with or before the actual fax. Without a fax cover sheet, you may expose yourself to few risks such as disclosing confidential information, creating uncertainty about the intended recipient, etc.

Use a fax cover sheet to secure your document and to make your fax more professional. Creating a fax cover sheet is super easy, hundreds of free fax sheet templates are already available on this site. Download a pre-made fax sheet and fill it. If you are facing issues in filling a fax cover sheet then do check out the step by step guide here on “How to Fill Out a Fax Cover Sheet”
What is a Fax Cover Sheet?
A fax cover sheet is a single page document that is faxed to a recipient before receiving the entire fax message. This sheet is sent to secure the fax message, and helps to identify the sender and recipient of a fax message. Basic information is added in a fax cover sheet.
Types of Fax Cover Sheets
Depending on the nature of fax, different type of fax cover sheets are available these days. Each sheet has it’s own purpose and features, some of the most commonly used fax cover sheet types are shared below.
- Simple Fax Cover Sheet
- Handwriting Fax Cover Sheet
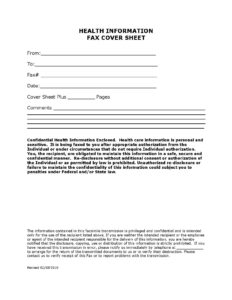
- Confidential Fax Cover Sheet
- Professional Fax Cover Sheet
- Personal Fax Cover Sheet
- Basic Fax Cover Sheet
- Holiday Fax Cover Sheet
- Business Fax Cover Sheet
- Masshealth Fax Cover Sheet
- UPS Fax Cover Sheet
- IRS Fax Cover Sheet
- Fax Cover Sheet with Disclaimer
Step by Step Guide on How to Fill Out a Fax Cover Sheet
Here is a 10 step guide to help you fill out a fax cover sheet more efficiently.
Step 1: Enter Your Contact Information
Firstly, enter your contact information to let the recipient know who’s sending the fax. Include your name, fax or phone number, email address, etc. On a business or company fax cover sheet, you need to add the company’s name, logo, tagline, etc.
Step 2: Enter the Recipient’s Contact Information
Just like sender’s information, you need to enter the Recipient’s Contact Information as well so that it’s clearly understood for whom the fax is sent. Enter recipient’s name, address or email address, etc.
Step 3: Date and Time of Transmission
Entering Date and Time of Transmission is extremely important for record purposes.
Step 4: Enter the Recipient’s Fax Number
Make sure to enter the Recipient’s Fax Number as well.
Step 5: Mention the Number of Pages Attached
Make sure to mention the number of pages that are attached or included in the fax message so that recipient can cross check the number of pages received.
Step 6: Add Subject for the Fax
Adding a subject or purpose of the Fax is important so that recipient understand what the message is about.
Step 7: Specify Urgency or Priority Level (if needed)
For urgent or priority level fax messages, you need to mark down the fax cover sheet with ‘urgent,’ ‘high priority’ or ‘for review’ in order to get a quick response from recipient.
Step 8: Enter any Notes or Comments
If you have any additional notes or comments related to the fax then write them in the “Message” section.
Step 9: Add a Confidentiality Statement, if required
If you are sending any confidential fax then make sure to add a Confidentiality statement to let recipient knows what the information is confidential and only the intended recipient can read the information.
Step 10: Attach Fax Cover Sheet as First Page
Fax cover sheet is the first page in the fax message, therefore make sure to attach it accordingly.
Conclusion
Now you know how to fill out a fax cover sheet properly. Sending a fax cover sheet is useful in many instances. If you are working at a place where faxing is done often then you must know how to create a fax cover sheet, how to fill it, and how to send it properly. Faxing is one of the most secure and reliable method of sending important documents from one place to another.